|
Use add/edit item from the text clips panel to add or edit a text clip.
Variables
Variables are defined in the top string grid. Variables are always enclosed with [[ ... ]] or % ... %. Variables can then be inserted anywhere inside the text clip.
The [[sel]] variable is a static variable and can not be changed.
Click on the [...] field to display a popup menu with all available commands. Selected commands are inserted in the second string grid.
Added variable names and commands can be edited and changed if necessary.
E.g.
----------------------------------------------------------------
[[name]] = @i My name
[[city]] = New York
[[date]] = @d[yyyy.mm.dd] Current date
[[time]] = @t[hh.nn] Current time
----------------------------------------------------------------
This is a simple and silly text clip. My name is [[name]] and i work in [[city]].
The current date is [[date]] and time [[time]].
Prompt for a text
Use @i to prompt for a text. You can define a default value between braces [].
E.g.
[[n]] = @i Name
[[myname]] = @i[Rickard Johansson] Name
This will open an input dialog asking for a text for the "Name" variable. The entered name is assigned to [[n]] which can then be used throughout the text clip.
Prompt using an input list
Display a list and get the selected value with @l (lowercase L).
E.g.
[[country]] = @l[Denmark|Germany|UK|Sweden] You home country
Current file name
Use @f to get the current file name + path.
E.g.
[[file]] = @f
It is possible to use one of the following commands with this variable:
#d = folder path (dir)
#f = file name (without path)
#e = file extension
E.g.
The file "#f[[file]]" is located in the "#d[[file]]" folder.
Current date
Use @d to get the current date. You can insert a formatted date string by using @d[<flags>] and do some simple calculations by adding {<time diff>}.
E.g.
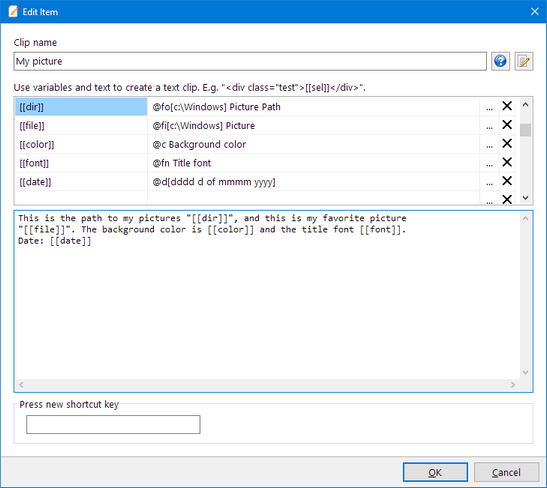
[[curdate]] = @d[dddd d of mmmm yyyy]
[[date]] = @d
[[tomorrow]] = @d[dddd d of mmmm yyyy]{+1d}
[[lastyear]] = @d[dddd d of mmmm yyyy]{-1y}
This will assign a string like "Monday 5 of June 2015" to the [[curdate]] variable and, depending on your locale settings, "2015-12-31" to the [[date]] variable
"Tuesday 6 of June 2015" to the [[tomorrow]] variable and "Monday 5 of June 2014" to the [[lastyear]] variable.
Note that the subtraction or addition must have an exact format and be enclosed by {}. It must begin with + or - and end with y, m, d, h, n or s.
Date format flags:
y = Year last 2 digits
yy = Year last 2 digits
yyyy = Year as 4 digits
m = Month number no-leading 0
mm = Month number as 2 digits
mmm = Month using ShortDayNames (Jan)
mmmm = Month using LongDayNames (January)
d = Day number no-leading 0
dd = Day number as 2 digits
ddd = Day using ShortDayNames (Sun)
dddd = Day using LongDayNames (Sunday)
ddddd = Day in ShortDateFormat
dddddd = Day in LongDateFormat
Current time
Use @t to get the current time. You can insert a formatted time string by using @t[<flags>] and do some simple calculations by adding {<time diff>}.
E.g.
[[time]] = @t[hh:mm:ss]
[[TwoHoursAgo]] = @t[hh:mm:ss]{-2h}
This will assign a string like "21:02:15" to the [[time]] and [[TwoHoursAgo]] variable.
Time format flags:
h = Hour number no-leading 0
hh = Hour number as 2 digits
n = Minute number no-leading 0
nn = Minute number as 2 digits
s = Second number no-leading 0
ss = Second number as 2 digits
z = Milli-sec number no-leading 0s
zzz = Milli-sec number as 3 digits
t = Use ShortTimeFormat
tt = Use LongTimeFormat
am/pm = Use after h : gives 12 hours + am/pm
a/p = Use after h : gives 12 hours + a/p
ampm = As a/p but TimeAMString,TimePMString
Color dialog window
Use @c <name> to open and select a color from a color dialog window.
E.g.
[[color]] = @c My Color
[[color]] = @c
This is a simple and silly text clip to select a color: [[color]]!
"Font color" is only displayed in the prompt window. It's optional and you can use any text you want.
Font dialog window
Use @fn to select a font from a font dialog window.
E.g.
[[font]] = @fn My Font
[[font]] = @fn
This is a simple and silly text clip to select a font: "[font]]".
"My font" is only displayed in the prompt window. It's optional and you can use any text you want.
File open dialog window
Use @fi[<initial path>] to open a file dialog window. The selected file name is inserted in the clip.
E.g.
[[file]] = @fi[c:\Windows] My File
[[file]] = @fi[c:\Windows]
This is a path to my file "[[file]]".
"My File" is only displayed in the prompt window. It's optional and you can use any text you want.
It is possible to use one of the following commands with this variable:
#d = folder path (dir)
#f = file name (without path)
#e = file extension
E.g.
The file "#f[[file]]" is located in the "#d[[file]]" folder.
Select folder dialog
Use @fo[<default dir>] to select a folder. The selected folder is inserted in the clip.
E.g.
[[dir]] = @fo[c:\Windows] My Folder
[[dir]] = @fo[c:\Windows]
This is the path to my pictures "[[dir]]".
"My Folder" is only displayed in the prompt window. It's optional and you can use any text you want.
Current selection
Use @csel to reuse the current selection in a text clip.
E.g.
[[seltext]] = @csel
Currently selected text: "[[seltext]]". And here we can paste it again: "[[seltext]]".
Clipboard content
Use @clbrd to reuse the clipboard content in a text clip.
E.g.
[[clip]] = @clbrd
<script>
[[clip]]
</script>.
|